Many summer days I have visited the roman town of Valeria. Every time I walked through it´s ruins, trying without success to guard myself from the sun, I asked myself the same question over and over. What did they eat around here? What kind of cookery ware was found between the remaining structure, between all these stones? Covered up during centuries, some of the objects were lucky enough to see the light again during the last century and were safely placed in the deposit or at display at the Archaeological Museum of Cuenca. Many others are probably still covered up by layers of soil at the place where they were left for the last time.
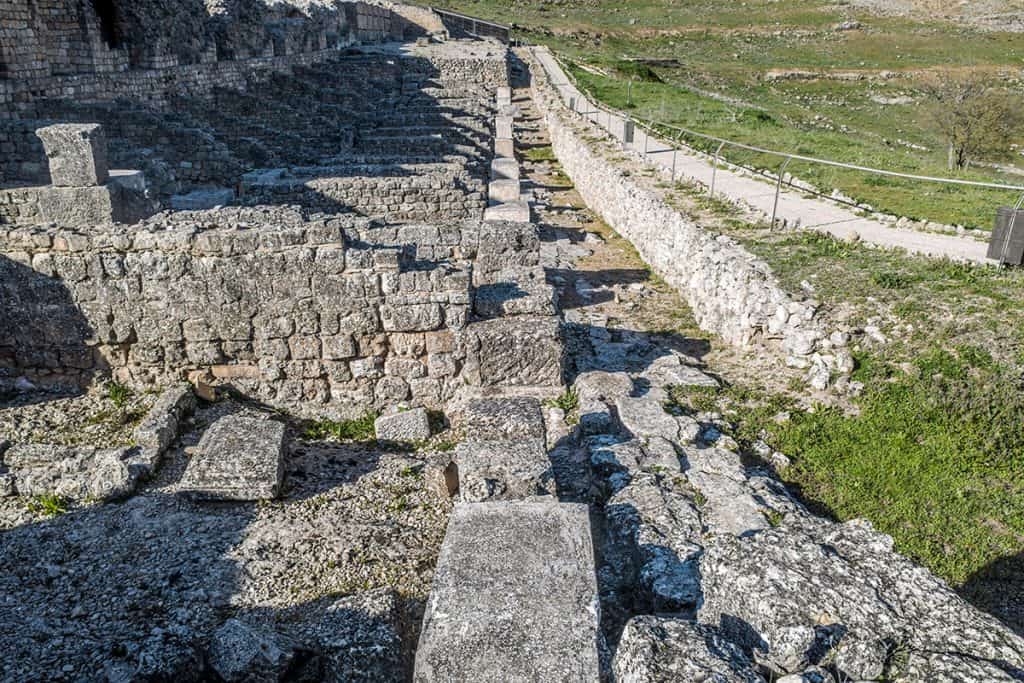
Tabernae in the roman city of Valeria
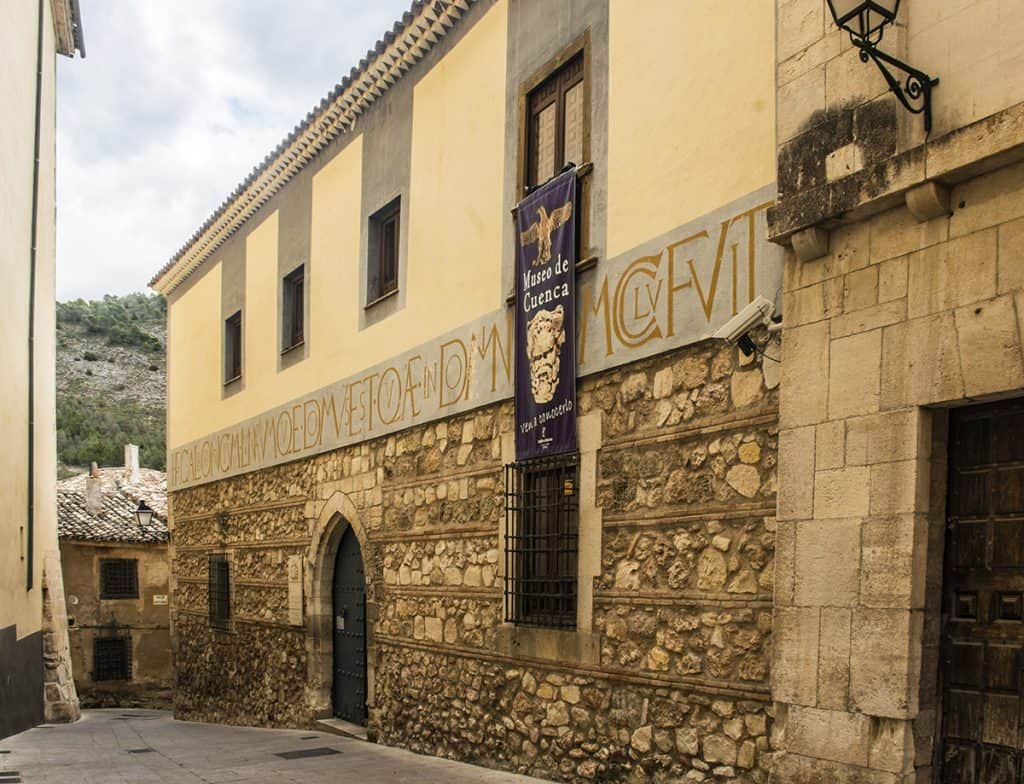
Museum of Cuenca
Now that the museum has reopend after lock-down, I had no excuse not to visit. Finally I would be face to face with the pots and pans that were found in Valeria and the other archaeological sites of Cuenca. So I took my camera with me and asked myself this question:
What did they actually eat around here?
To find out, I propose a refreshing post fit for summer. Because who wants to memorize dates and long lists of ingredients with these high temperatures? So, without further ado, I hereby present: ‘the illustrated Roman cookery ware’. A little tour along some of the museum’s objects, which I have illustrated with some coeval tasty ideas of our friend Apicius.
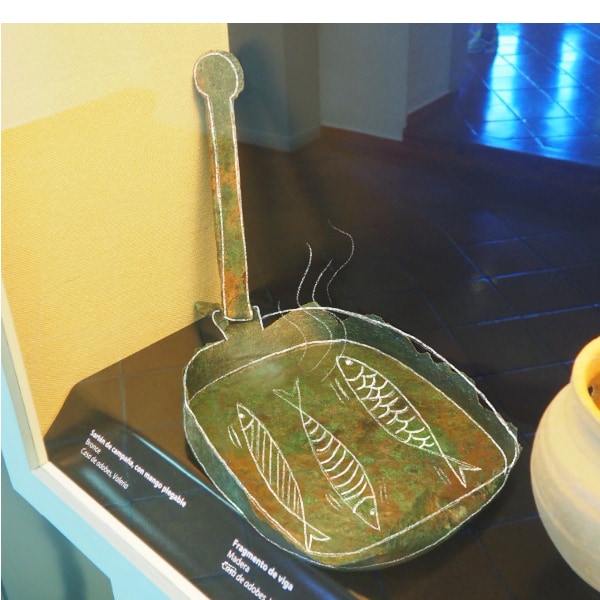
Fried fish
Illustrated foldable pan
To start off, I suggest to pan fry some fish of your choice, preferably in season. Have you noticed the foldable handle of the pan, by the way? Our current handy (foldable) camping gear is not so new now, is it? Except from the ultra-light materials of course.
After frying the fish, garnish them with pepper, wild celery and onion. Finish off with a splash of oil and garum and they are ready to eat.
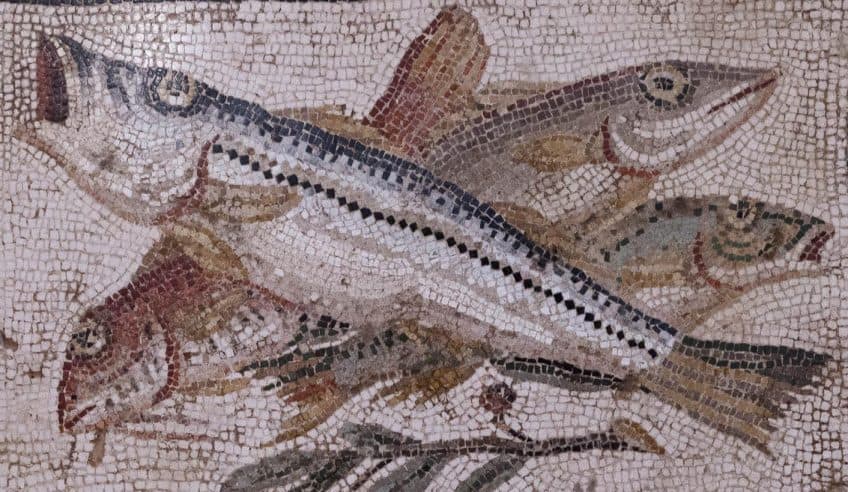
Fish mosaic. Archaeological museum Naples.
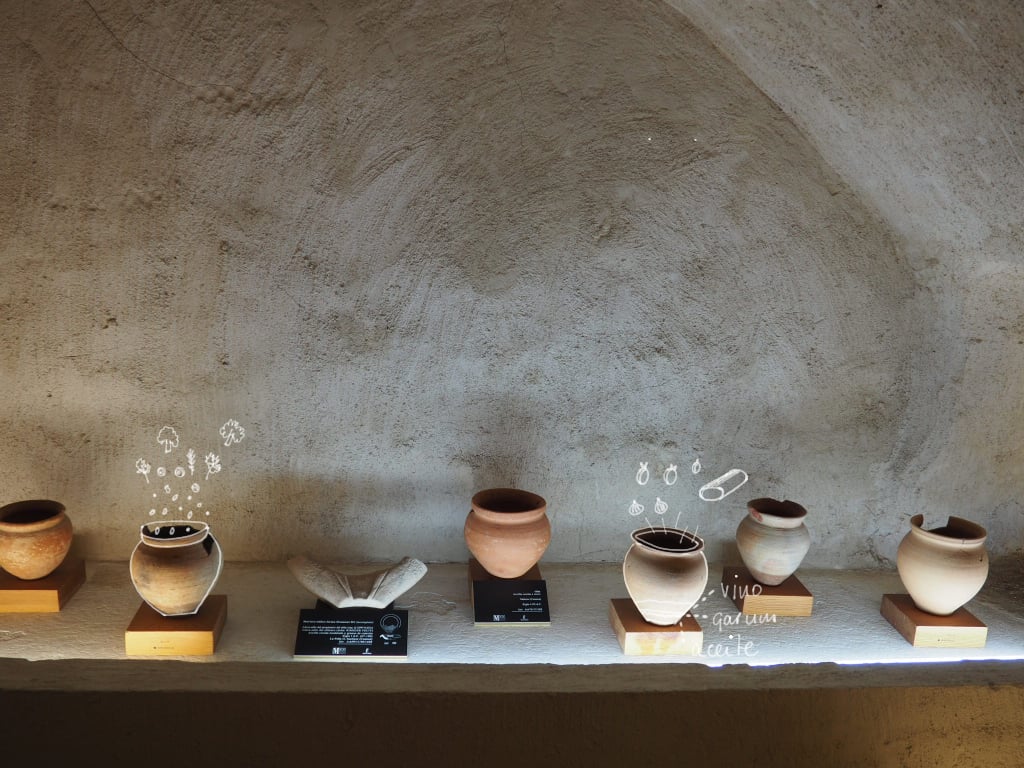
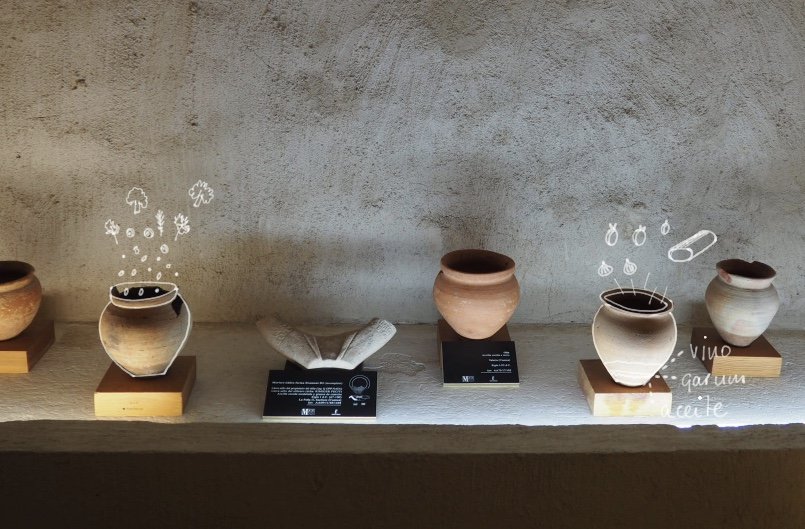
Stews
Roman stews
For the next few dishes we have to step down into the nice and cool cellar. Judging from the many earthenwarepots in front of us, it´s stew time. In the pot on the left we will prepare a dish with barley, lentils and peas, but stacked with vegetables and herbs as well, such as leek, broccoli, fennel and dill. Don’t forget to season with our precious garum.
On the right I suggest another stew with chopped up pork loin, onion and dried apricots. A sweet and salty combination we still love nowadays. To this roman version we have to add pepper, cumin, dill, and … of course, a splash of garum.
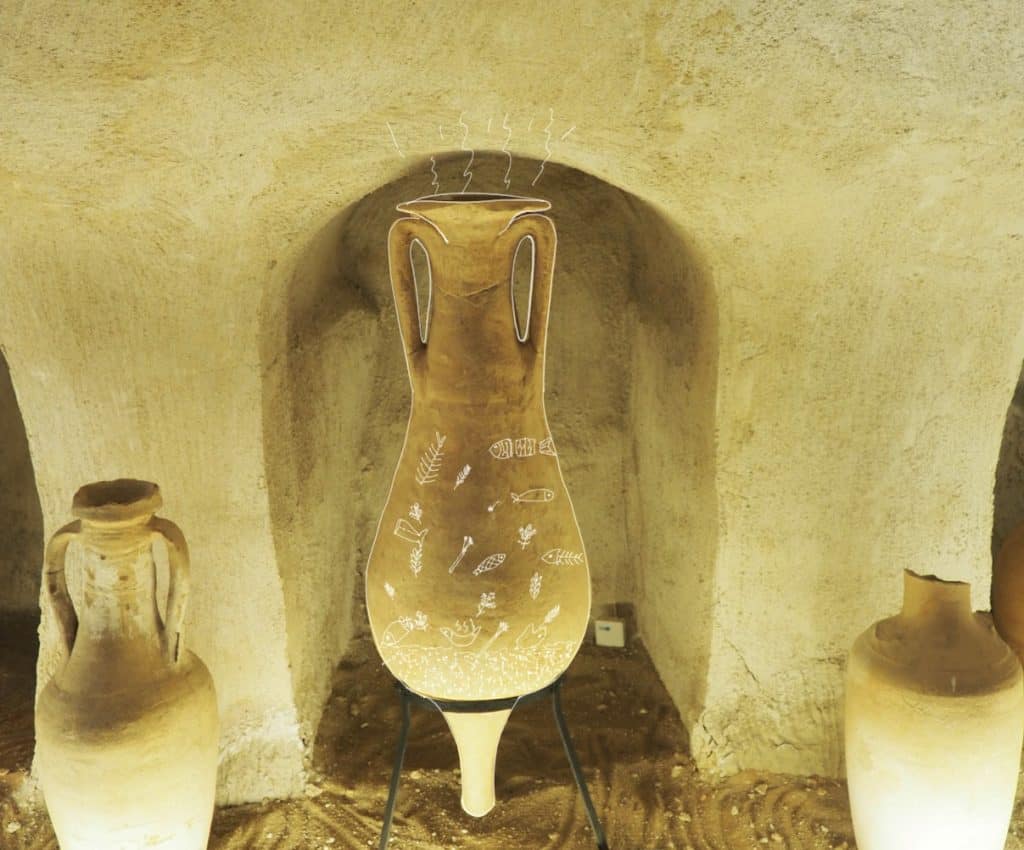
La pièce de résistance
Amphora to store garum
After having brought up the roman taste booster a few times, I hereby present the most spectacular piece in the cellar: an amphora to store this precious liquid. After being produced in the salting factories down at the coast of the peninsula, the garum was transported and stored in beautiful containers such as this one. An amphora filled with roman fish sauce was undoubtedly worth a fortune.
After stepping out of the cellar, there are plenty more plates, bowls, and mortars to see in the museum’s collection. I can assure you however, that with this little tour, the visits to the site of Valeria have become much more flavourful.
Recipes from:
Marco Gavio Apicio. The art of cookery – De re coquinaria. Recetas de la Roma imperial. Barcelona 2007.
Lately I´m being chased by eggs. Suddenly they appear on a mural painting in a small village in Cuenca, or on a painting in a bar along the Galician coast, or in an art gallery next to a Dutch canal.
The chase is not only by images, but also by praised eggs in writing, such as in weekly newspaper magazines or in books from the great Vázquez Montalbán. No complaints, though.
In his novel Erec y Enide Montalbán includes this beautiful passage:
“…let the eggs slide into the pan to curl up and turn into lace with a golden peak. Eating fried eggs is like experiencing a triple sensory delight, of smell, taste and slicing of the soft and crisp textures with a knife, the pouring of the yellow and essential honey, the dish turned into a palette, a palette proposal.”
So, what do you think? Hold on tight, because here comes the ode to some eggs from Cuenca, published in the latest gastronomic edition of El País Semanal.
“The essence of a naked fried egg. La Ponderosa, Cuenca.
A bar, nothing else. No bar stools to sit on. Nevertheless, it’s impossible to forget that trip to the essences at La Ponderosa in Cuenca. Even among the mushrooms, the tomatoes, the sweetbreads, the partridge served to the Royal Family – everything brought to the sophisticated art of simplicity– what stands out are their masterly fried eggs. Not only because of the product and the good care of their own chickens, but because of the touch of vinagre that makes them unique.”
Their masterly simplicity, I couldn’t agree more. What a treat!
Not just eggs, but chased by fried eggs. Fried! You will understand I had no choice but to prepare some for dinner. And dip in some bread like crazy.
But here’s the thing. How do you prepare those memorable eggs? The ones you don’t seem to forget about and that make you sigh every time they come to your memory.
To help us out I have prepared a special kind of manual. It’s a visual guideline along the painted eggs I mentioned at the beginning, and which I have turned into an artistic recipe:
The Alarcón one
Jesús Mateo, Alarcón mural (detail), 2002.
Find the best possible eggs. They can appear anywhere, even in a church turned into a enormous mural painting.
This great yolk can be found in the church of Saint John the Baptist. Jesús Mateos has covered the interior walls with this own interpretation of the universe. An overwhelming space that leaves you amazed.
The sunbathing one
Maralla Paz, Sunbathing eggs
Crack the egg onto a little plate, this will help us add it to the pan and avoid any piece of shell sneaking in.
A work by the Galician painters Maralla Paz. This work, amongst others, can be found in the bar, restaurant and hostel Balieiros, where she also has a little studio set up. Not only will the surroundings and the views, which play and important part in her works, captivate you, their friendly atmosphere and excellent kitchen will convince you to keep visiting.
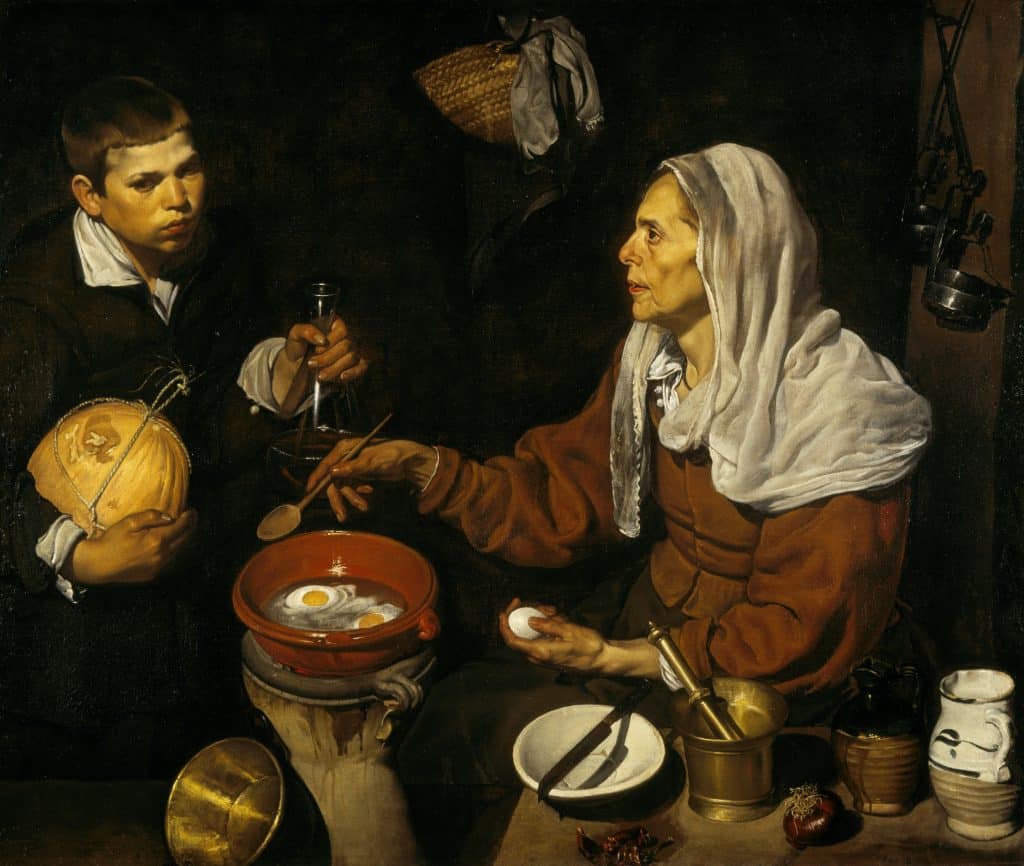
The famous one
Diego Velázquez, An old woman cooking eggs, 1618. Scottish National Gallery. Purchased with the aid of the Art Fund and a Treasury Grant 1955.
Add oil to the pan and heat it up. Half an inch should be fine. When the oil is hot, but not smoking, add the egg to the pan. I’m sorry, Velázquez, but I can’t hear these eggs sizzle, the oil is not hot enough.
Nevertheless, the eggs by the Sevillian painter have to be included into this recipe. We’re talking about Velázquez´s eggs! Well, and because of the brilliant textures of all the objects and how he uses the light to bring out their features.
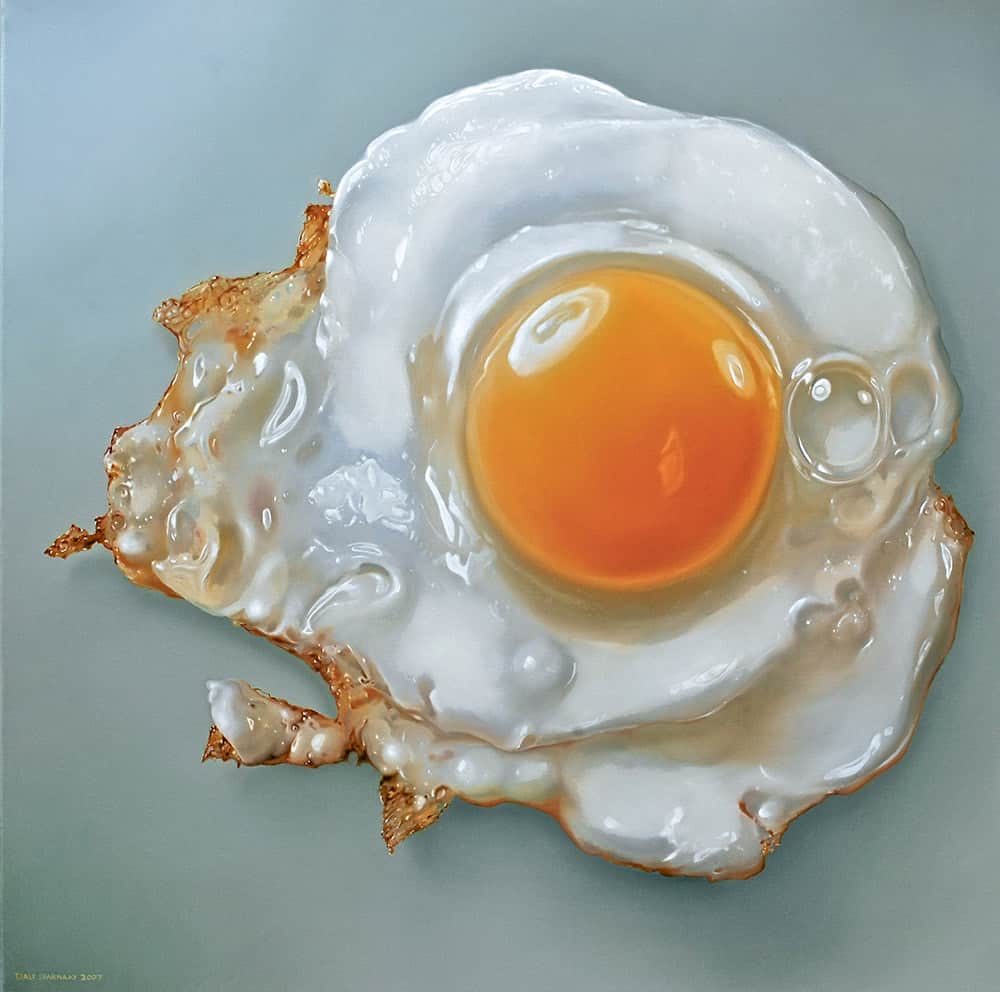
The one with the lace
Matías Montoya, Fried egg. Trino Tortosa Gallery
Fry the egg covering the upper part with some oil to curdle the egg white. Let it curl up as much as you like and cook the yolk as desired.
This egg, with its almost running yolk, is from a painter from Almería: Matías Montoya. Don’t miss out on his other realistic paintings: a ham sandwich and a ready to eat hamburger, they will make your mouth water.
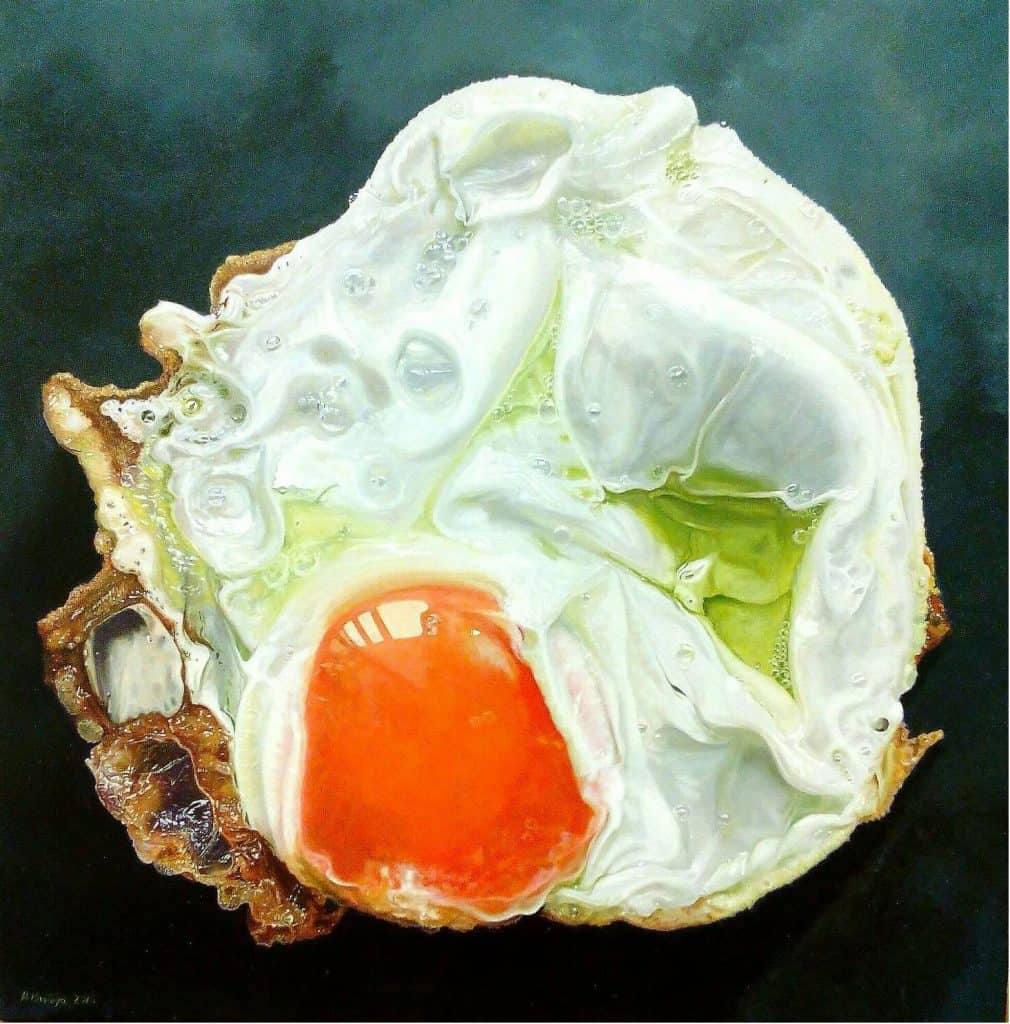
The hyperrealistic one
Tjalf Sparnaay, Fried egg, 2007.
If you prefer you can fry the egg with less oil, almost grilling it like this one, a tipical Dutch egg. Not as juicy, but with a great crunchy bite.
This Dutch artist, Tsjalf Sparnaay, is specialized in making food paintings and has turned the fried egg into his star dishon canvas. During the last few decades he has made several different versions of the fried egg, big and small. Currently the museum Jan in The Netherlands is hosting a solo exhibition of his tasty works.
And to finish off the recipe, serve the egg on a plate, add some salt and a few drops of vinegar to taste. Ready to dip in some bread.
Well, what are you waiting for?
And remember, a couple of eggs in you pantry or on a canvas always come in handy.
Today we are cooking a painting… Cooking a what? Yes, cooking a painting, you´re not crazy. Sounds yummy, right? I guess you already know what I´m talking about, so let´s dig in…
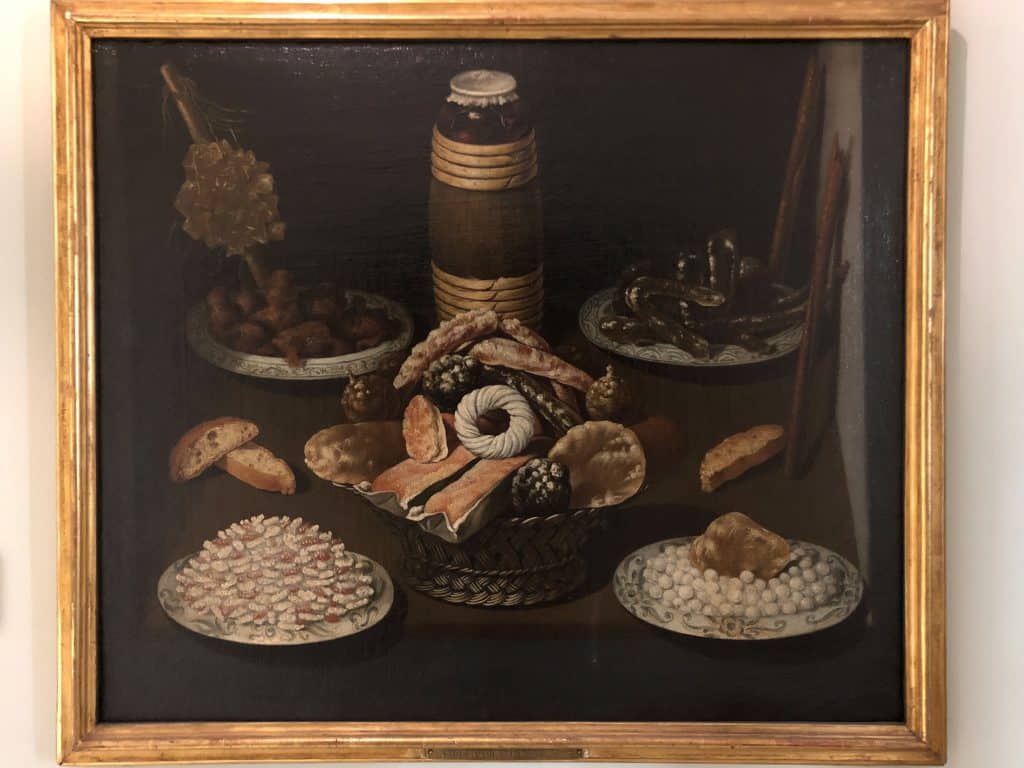
In the calle Alcalá in Madrid we can admire an assortment of sweets on canvas, they seem to be taken directly from an old sweet-shop, a zuclería as my great-grandmother would have said. No chance of finding mass-produced sweets wrapped in plastic here. Only quality products made with care, or at least that´s how I imagine it. Of course they are also made with butters and sugar, but hey, eaten once in a while they taste wonderful. Even more if you realize they can be admired in a museum.
Workshop of Juan van der Hamen, Still life with sweets, 1596-1611. Real Academia de Bellas Artes de San Fernando, Madrid.
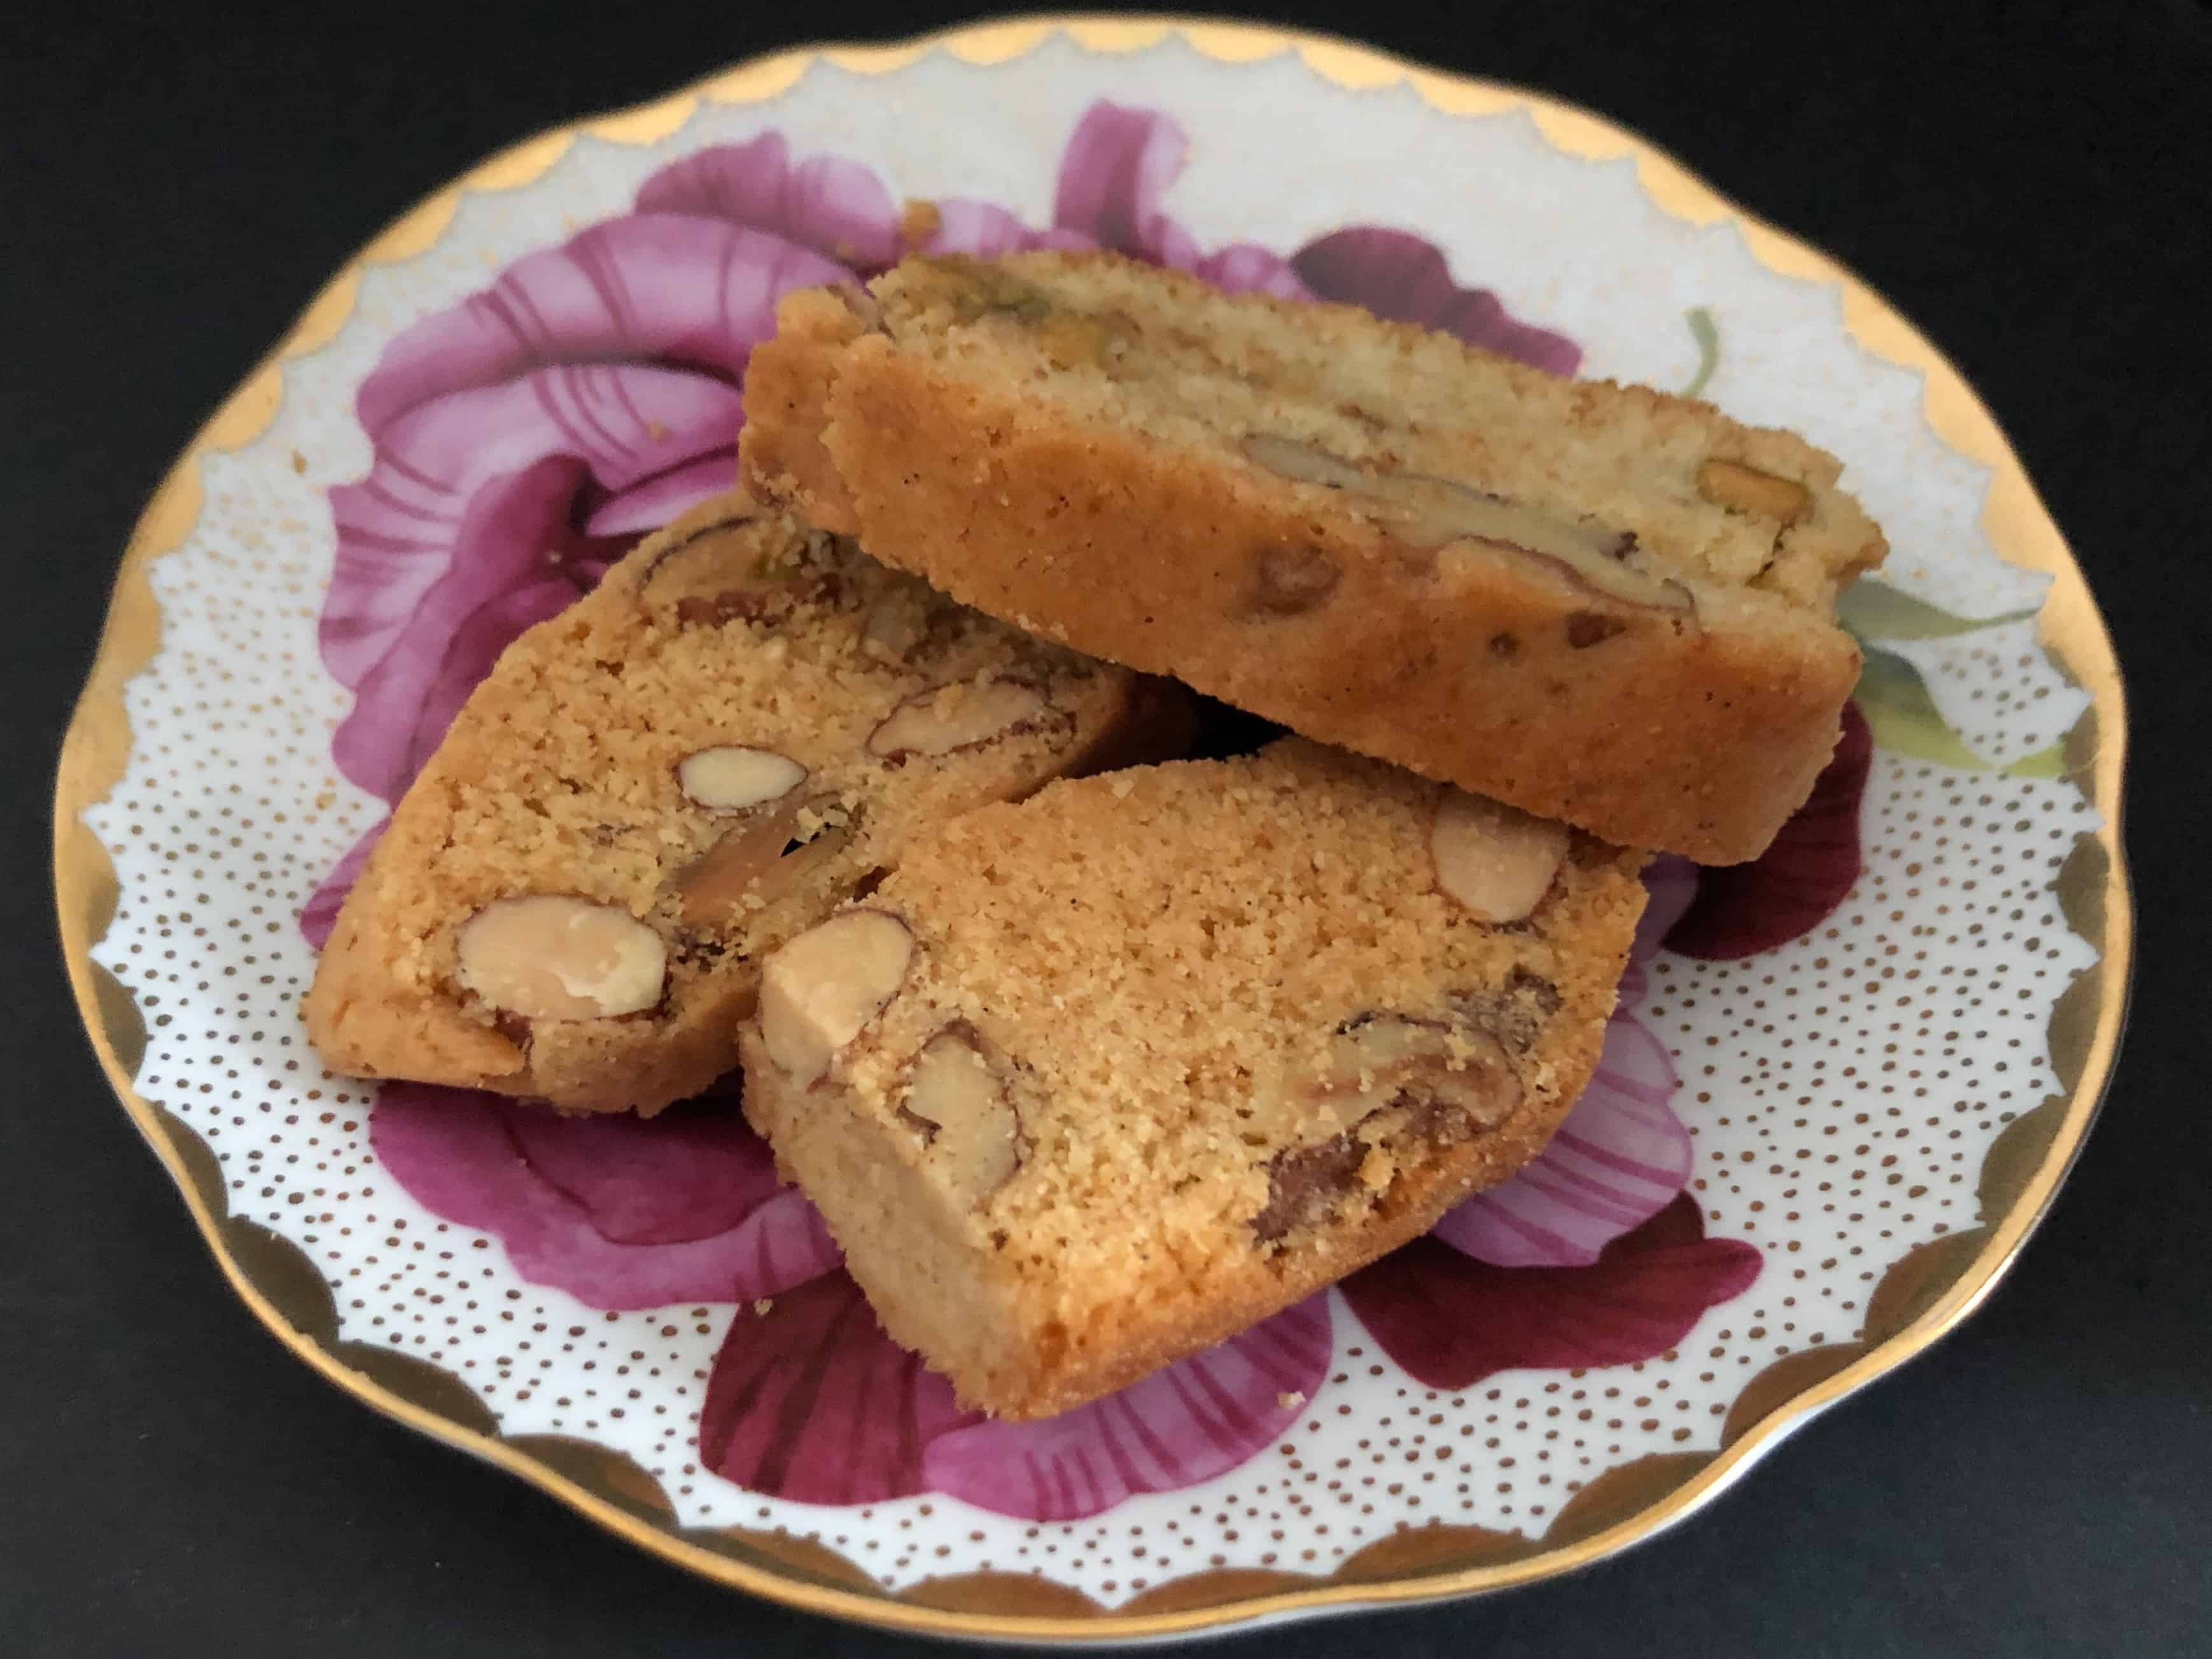
Today we are making exactly what a biscuit means: from the latin bis coctus: baked twice. With this method they keep very well, actually so well that these type of biscuits were taken as staple at sea. Maybe not as fancy as the ones I´m making today, because these are filled with nuts, seeds and spices. On ships I assume they would be plain and simple, just like the ones we use nowadays to spread pate or cheese.
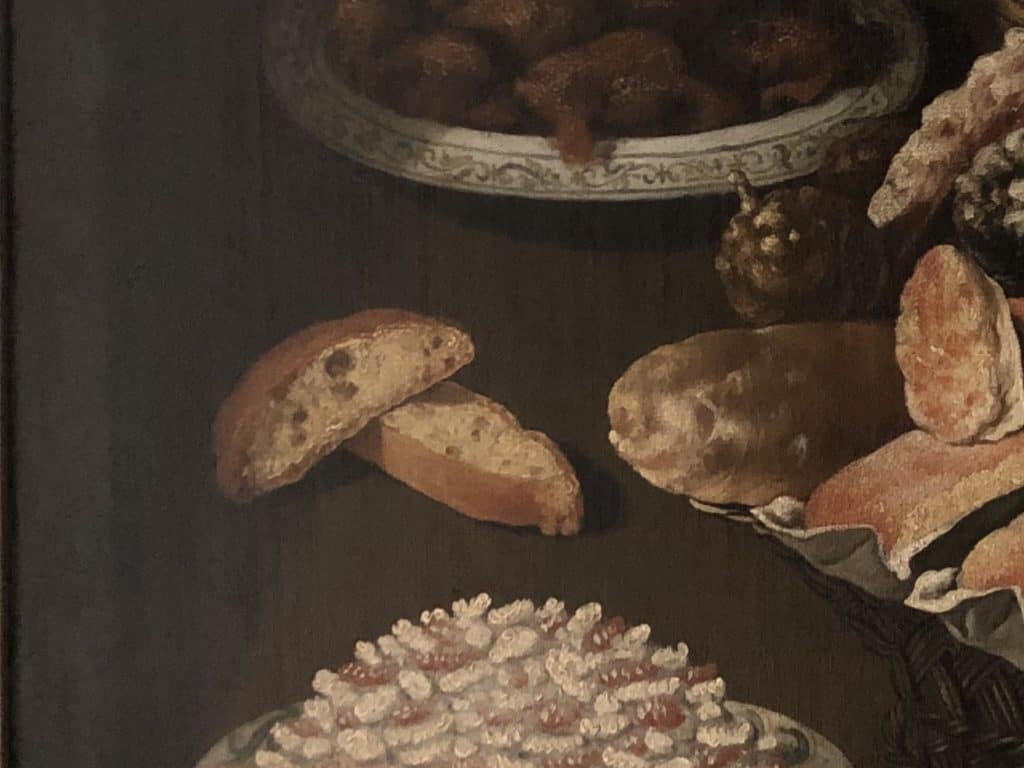
Workshop of Juan van der Hamen, Still life with sweets (detail), 1596-1611. Real Academia de Bellas Artes de San Fernando, Madrid.
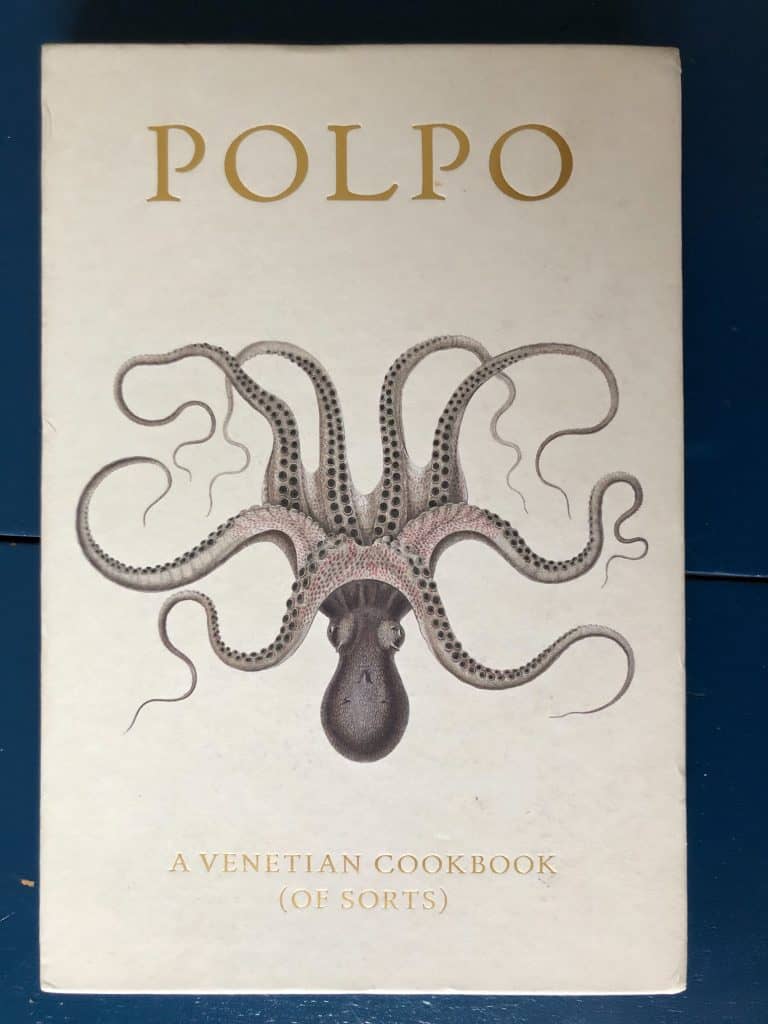
A recipe of these delicious biscuits can be found in the cookbook: Polpo, a Venetian cookbook (of sorts). It´s certainly worth taking a peak in, and to prepare one or two delicious recipes from it. Yes, we also have these biscuits here in Spain, similar to the ones we can see on the painting. This cookbook however, is conveniently placed on one of my bookshelves, in this case I didn´t had to look much further, and besides, I was looking forward to taste this particular recipe, so there you go. The touch of fennel and the different nuts make it a biscuit worth trying.
Cantuccini
For 60 biscuits
Ingredients:
3 medium egg whites
3 whole medium eggs
400 g caster sugar
seeds from 2 vanilla pods
2 teaspoons sesame seeds
1 teaspoon fennel seeds
600 g 00 flour
4,5 teaspoons baking powder
375 ml sunflower oil
500 g mixed walnuts, almonds and pistachios, roughly chopped
Method:
Take a large mixing bowl and a wooden spoon and beat together the egg whites, the whole eggs, the sugar and all the seeds – vanilla, sesame and fennel. Make sure everything is nicely combined. Slowly add the flour, the baking powder and the oil and continue to combine with your spoon. Add the chopped nuts and mix thoroughly. Place, covered, in the fridge and leave overnight to stiffen.
The next day, preheat the oven to 200ºC. Oil a baking sheet and line it with baking parchment. Lay the mixture in a mound like a long squat loaf of bread from one end of the tray to the other. You should be able to fit two of these elongated mounds (about 30x15x4 cm) on the tray. Bake for 30 minutes in the preheated oven.
Remove from the oven and when cool enough to handle slice into 1 cm slices. Meanwhile, turn the oven down to 140ºC. Lay the slices flat on a wire rack and place back in the oven for 15 minutes, or until the biscuits are completely dried out.
These cantuccini will last for weeks if stored in an airtight container. To serve, place 2 biscuits alongside a chilled glass of Vin Santo (or any dessert wine you like, of course)
Come on, what are you waiting for? Go bake these delicious biscuits. And go contemplate some mouth watering canvases, I´m sure they can inspire you to make sweets worth selling in a shop like Van der Hamen´s.
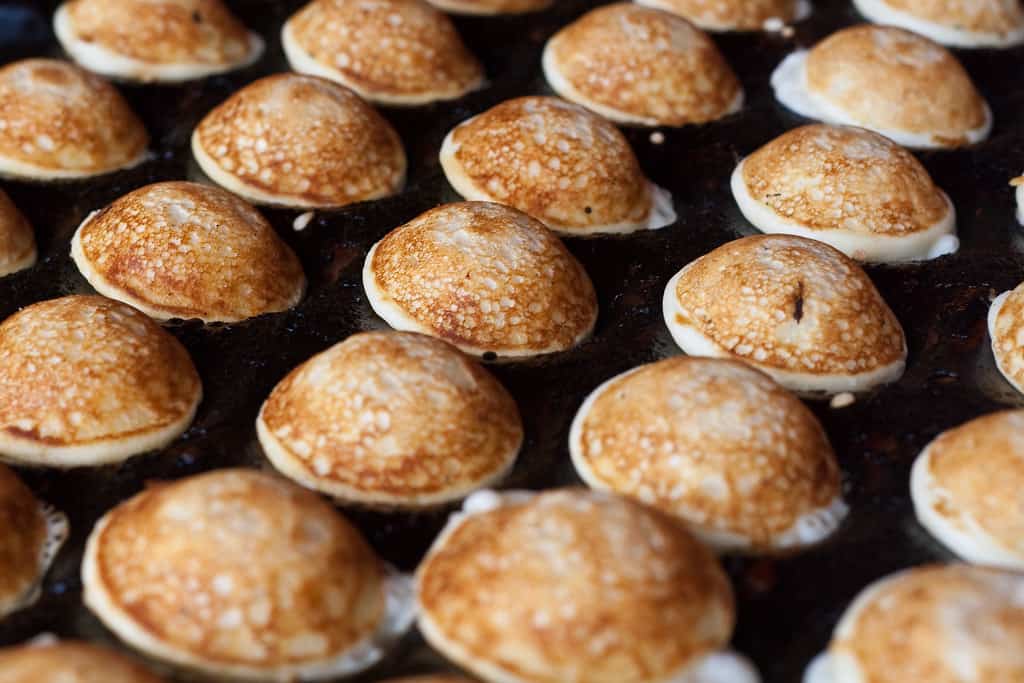
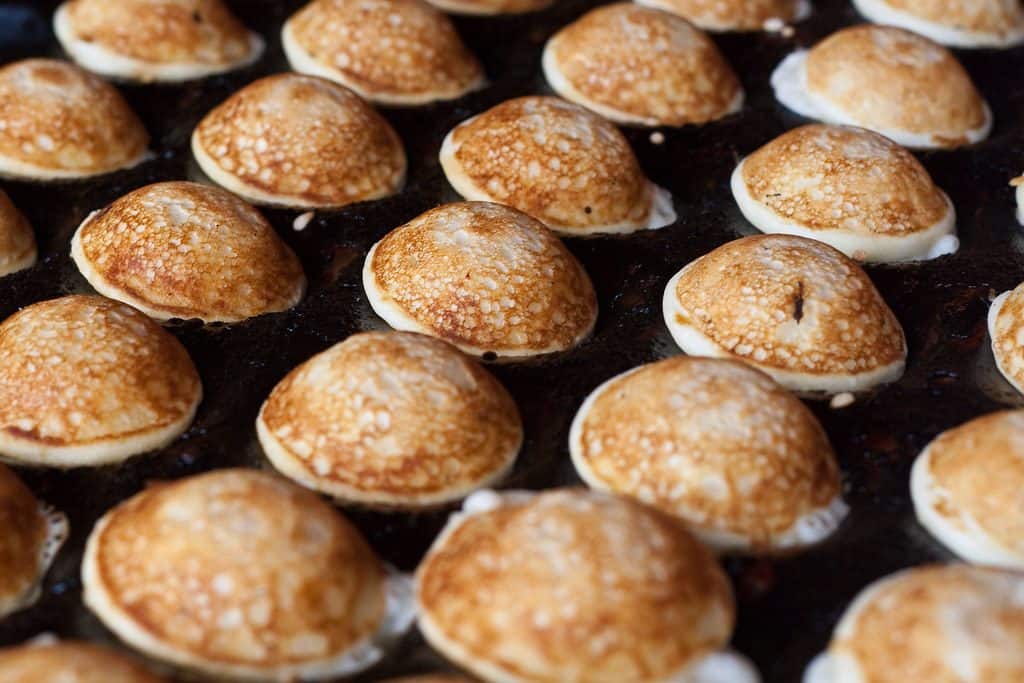
We want poffertjes, we want poffertjes! Oh, please… make us some poffertjes, they taste so good!
This was almost the first thing that I heard a few days ago, when I arrived at my family´s home, where I went to spend a few days. For those of you who are not familiar with poffertjes, they are small dutch pancakes, served with icing sugar and butter. Simply delicious… and a winner dish for the entire familiy. Last week I made more than 200 of them and they all dissapeared! Just saying…
Today is about these pancakes, with not just one, but three different recipes for you to try out. And you know, I´m not just looking for old recipes, but I also try to find historic images, the older the better.
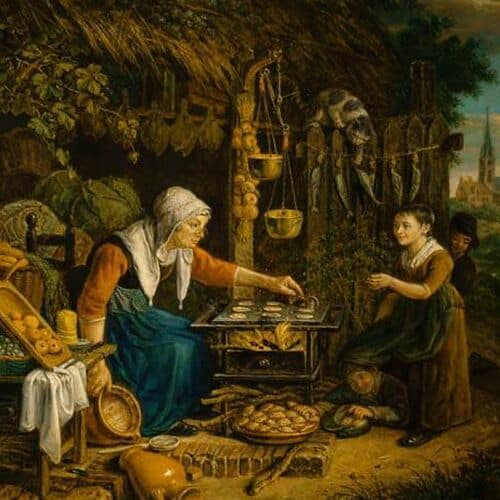
J.P. van Horstok, The deceit, 1819. Oil on panel. Frans Hals Museum, Haarlem.
As I was telling you, they are small round pancakes, baked in a special pan or on an iron plate, with little holes to shape them and give them a bit more volume. On this painting, the woman is making them on that type of iron plate with holes. Even though we can´t see it that well, we do see the baked pancakes next to it, on a plate on the floor. I don´t find it strange at all that the three kids are lurking around to pick one or two from the plate. This situation is actually quite familiar, when I was baking them myself last week, some of my little guests sneaked up on me and dissapeared again with a poffertje in their mouth, as if I wouldn´t notice. By the way, I hope the resemblance with the cook itself doesn´t match as well…
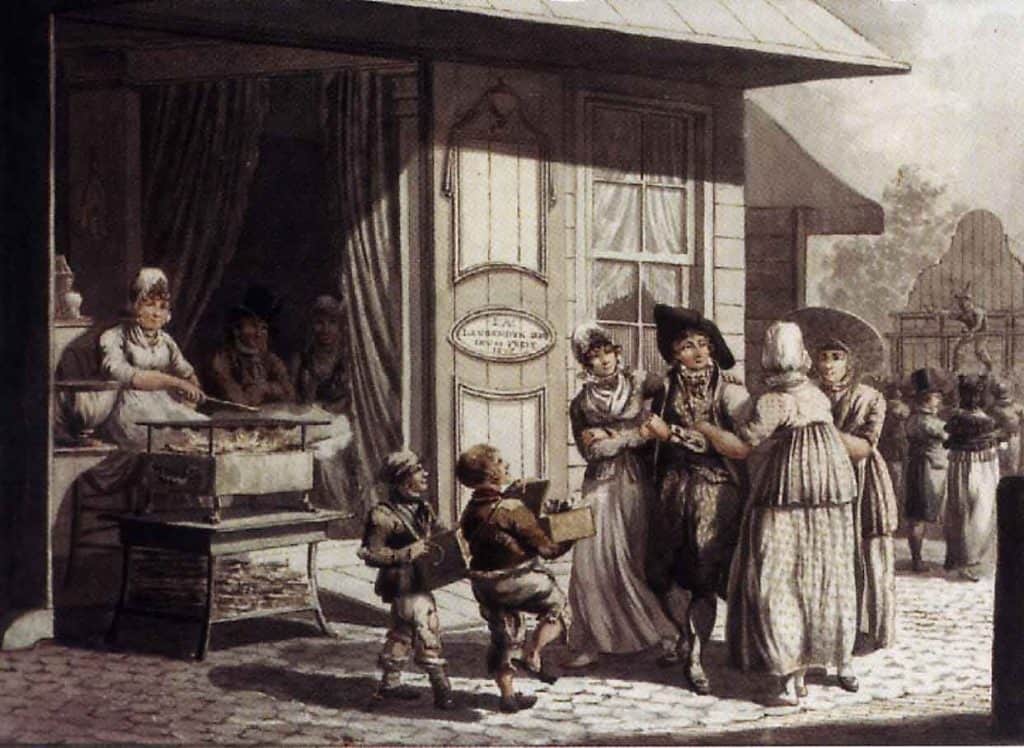
J.A. Langendick, Poffertjes stand, 1780-1818. Charcoal, ink and watercolor on paper.
In this other image we can see the holes for the poffertjes better, as the drawing of this iron plate is made from a different view. These stalls in which the poffertjes were baked were very common on fairs and markets, even today, but the poffertjes are also quite often made at home, in a smaller round pan. However, if you see the grills they use nowadays in these stalls, they are enormous. And the speed at which the cooks turn those little suikers, almost at the speed of light. Well… you know what I mean.
It makes your mouth water, doesn´t it?
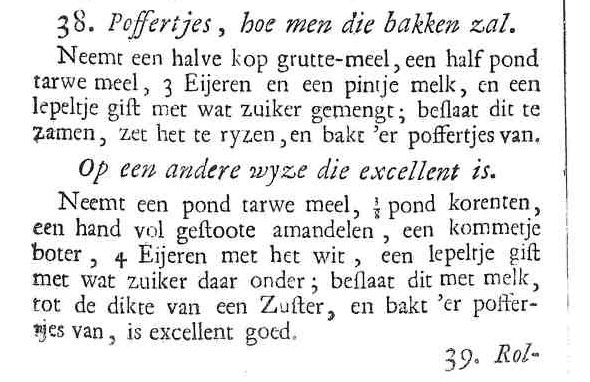
Don´t worry, I will tell you how to make them right now. The first recipe of this cute pancake is found in De volmaakte Hollandsche keuken-meid, a recipe book from 1746. Actually, in the addendum that came with the third edition, in 1754. It´s an anonymous Dutch recipe book, however, the introduction states that the author is ´a distinguished lady, recently passed away in The Hague´. Even though we don´t have a name, we know the distinguished character of the book and its audience. Even the title is quite clear about it: The perfect Dutch kitchen maid. Luckily we´re not perfect ourselves, but we do have enough enthusiasm to get on with the two recipes of poffertjes we can find in this book.
Poffertjes in 1754
Poffertjes, picture by Tijs Zwinkels, Flickr.com (CC BY-SA 2.0)
38. Poffertjes, how they should be baked. Take half a cup of buckwheat flower, half a kilo of wheat flour, 3 eggs, a pint of milk*, a little spoon of yeast mixed with a little bit of sugar; mix everything together, let it rise and fry poffertjes.
Another way which is excellent. Take half a kilo of wheat flower, 3/8 of a kilo of raisins, a handful of ground almonds, a little bowl of butter, 4 whole eggs, a little spoon of yeast mixed with some sugar; mix everything with milk, until you obtain a thickness like a Sister**, and fry poffertjes, they are excellent good.
*Approximately 600 ml **This corresponds to a recipe of a tart/cake with almost the same ingredients. In this recipe book we can find instructions for a ´Big Sister´ and for a ´Small Sister´. I´m very curious to know what they are and taste like…
I can´t wait to try these two old recipes, but I´m afraid I will have to wait for my poffertjes pan to arrive. Don´t ask why, but at my own place, I still haven´t got one. Once I receive it, I will get cooking. In the meantime, I will share this contemporary recipe with you as well. I have made them quite a few times, and they are very good.
Poffertjes
Ingredients:
Makes about 30-35 poffertjes. They are prepared in a pan such as this. You can make them in a regular pan, but they will be bigger and flattened, similar to American pancakes.
For the batter: 300 g milk 15 g fresh yeast 1 egg 15 g sugar pinch of salt 100 g sour cream (reduced-fat) 200 g flour (you can use buckwheat flour instead, or a combination of the two) 50 g melted butter
To serve: icing sugar butter at room temperature
Method: Mix all the ingredients together with a whisk until smooth. Cover up with a humidified cloth or place some cling film directly onto the batter to avoid it from hardening. Leave the batter to rest for an hour.
Heat up the poffertjes pan on a medium heat, and grease it with butter using a brush. Fill the holes with the batter using a spoon or even better, with a plastic bottle that has a dispenser. Turn the poffertjes with a skewer or a small fork before the surface is cooked. Let them brown and place them onto a plate. To make it easier you can pick them up one by one with the skewer. For large quantities you can place the plate over a pan with hot water to keep them warm. Serve warm, dusted with icing sugar and a few pieces of butter. Aproximately 12 poffertjes per portion.
Last poffertjes tasting in Amsterdam
Let me know what you think about these poffertjes from the North, I´m sure they will be a success. Meanwhile I will keep on investigating because I believe there are recipes even older than the two I mentioned today, images as well probably. Until next time!
References:
J. van Dam, J. Witteveen. Koks & keukenmeiden. Amsterdam: Nijgh & Van Ditmar, 2006.
To celebrate the recipes category of mycurioseaty, I believe baking a cake would be in order, don´t you think? It has to be a grand cake of course, a royal one if possible, not just any cake.
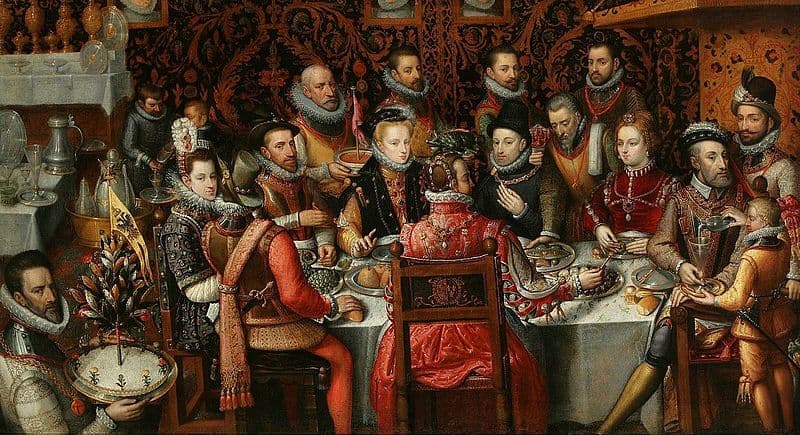
Do you remember the first piece of the blog on cake decoration, where I showed you an image with a banquet starred by Philips II, Charles V and co.? Well, it´s not a cake, but the tart on that painting looks pretty grand to me. Let´s bake that, or at least give it a try. One royal tart to go, please!
Anonymous (attributed to Alonso Sánchez Coello), The Royal Feast, 1596. Narodowe Museum, Warsaw.
But how could we possibly know what it tasted like, what ingredients could have been used? Well, don´tt worry, to find out what type of tart this might have been, I have searched in written sources from around that time, end of the 16th, beginning of the 17th century, specifically in historic cookbooks from the Low Countries. The paintings with similar tarts I showed in that article were made there, and the title of the royal banquet is quite clear about who was in charge in Flanders at the time. It is quite possible that similar tarts became fashionable, or maybe they were already. What has become clear when searching in these cookbooks is that these types of tarts were made and eaten, not only at royal tables.
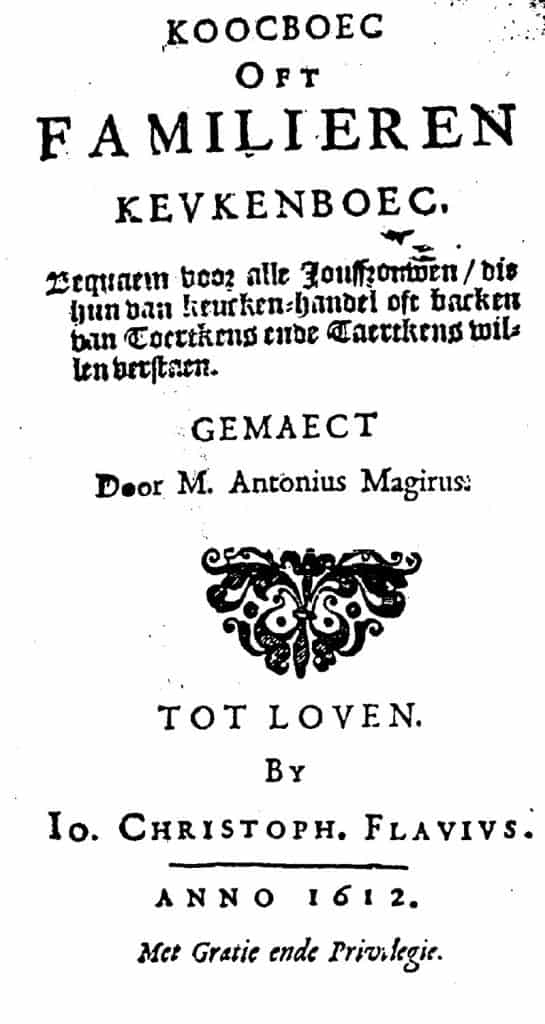
A candidate recipe can be found in a cookbook from the beginning of the 17th century in Leuven, city which was then part of the Spanish Netherlands. The so-called Koocboec of Antonius Magirus[1], contains a total of 55 recipes for pies and tarts, which is quite a compilation.
What strikes your attention, while reading these recipes, is the clear distinction that is often made between white and dark tarts and pies. Depending on the ingredients the cooks had or the ones that could be replaced for others, the result would be a lighter or darker filling. If we look closely at the painting, we can see both types. The tart with the lighter filling can be found on the foreground and the brown one more at the back of the scene. Given the level of decoration and the prominent place, it appears the lighter one is more important. This distinction could be similar to the one that used to be made between white and wholegrain bread. Maybe something that is worthwhile exploring.
Back to the recipe, I have to admit, that adaptation to current circumstances is in place. I´m used to doing it with contemporary recipes as well. You can also call it: doing whatever you like. Besides, older recipes don´t tend to be very detailed in quantities or instructions. So, let´s give it a try then!
Frontpage of ´Koocboec oft familieren keukenboec´ by M. Antonius Magirus. Printed in Leuven in 1612. Transcription available at: http://www.kookhistorie.nl/
Today we are going to prepare a ´royal tart with pine nuts, almonds and other stuff´.[1] Yes… stuff is part of the ´detailed´ description I´m afraid, let´s see what it is. Nevertheless, the royal part of the title suits our painted tart, as well as the fancy pine nuts and almonds.
First, I will reduce quantities, otherwise we will be eating tart for a month. Besides, the pound of pine nuts that goes into the filling would take away a big chunk of the recipes budget. Regarding the ginger, I have used just a teaspoon of the powdered version. I do wish to try this recipe with stem ginger on syrup, I´sure it would suit the tart very well.
The dough is made with the ingredients of a shortbread crust, which is almost identical to the ones listed by Magirus[1], except for the baking powder or self-raising flower some people use today.
Photo by rawpixel on Unsplash
Royal tart with pine nuts and almonds
Ingredients: For 2 individual round pie molds or 1 mold of 15cm
The dough: 150g self raising flour 75g butter 35g icing sugar and some more for decoration 1 egg yolk 12g rose water
The filling: 50g peeled almonds 50g pine nuts 100g sugar 75g cream cheese 1 egg yolk, beaten 40g apple 1 tsp ginger Pinch of nutmeg Splash of rose water
Method
The dough: Sieve the flour onto a clean flat surface. Add the butter in cubes and mix well with your fingers. Add the yolk, sugar, rose water and mix without kneading the dough. Form a ball, wrap it in plastic and let it rest for a few hours in the fridge. Roll out the dough and cover the mold with it. Pick the dough with a fork to prevent it from raising and bake the crust in a preheated oven at 180ºC for aprox. 10-15 minutes. Let it cool.
Filling: Grind the almonds and pine nuts together with the apple. Add all the remaining ingredients and mix well. Pour the mixture into the crust and bake at 180ºC for 15 minutes or until slightly golden. Let the tart cool down and finally dust with icing sugar.[1]
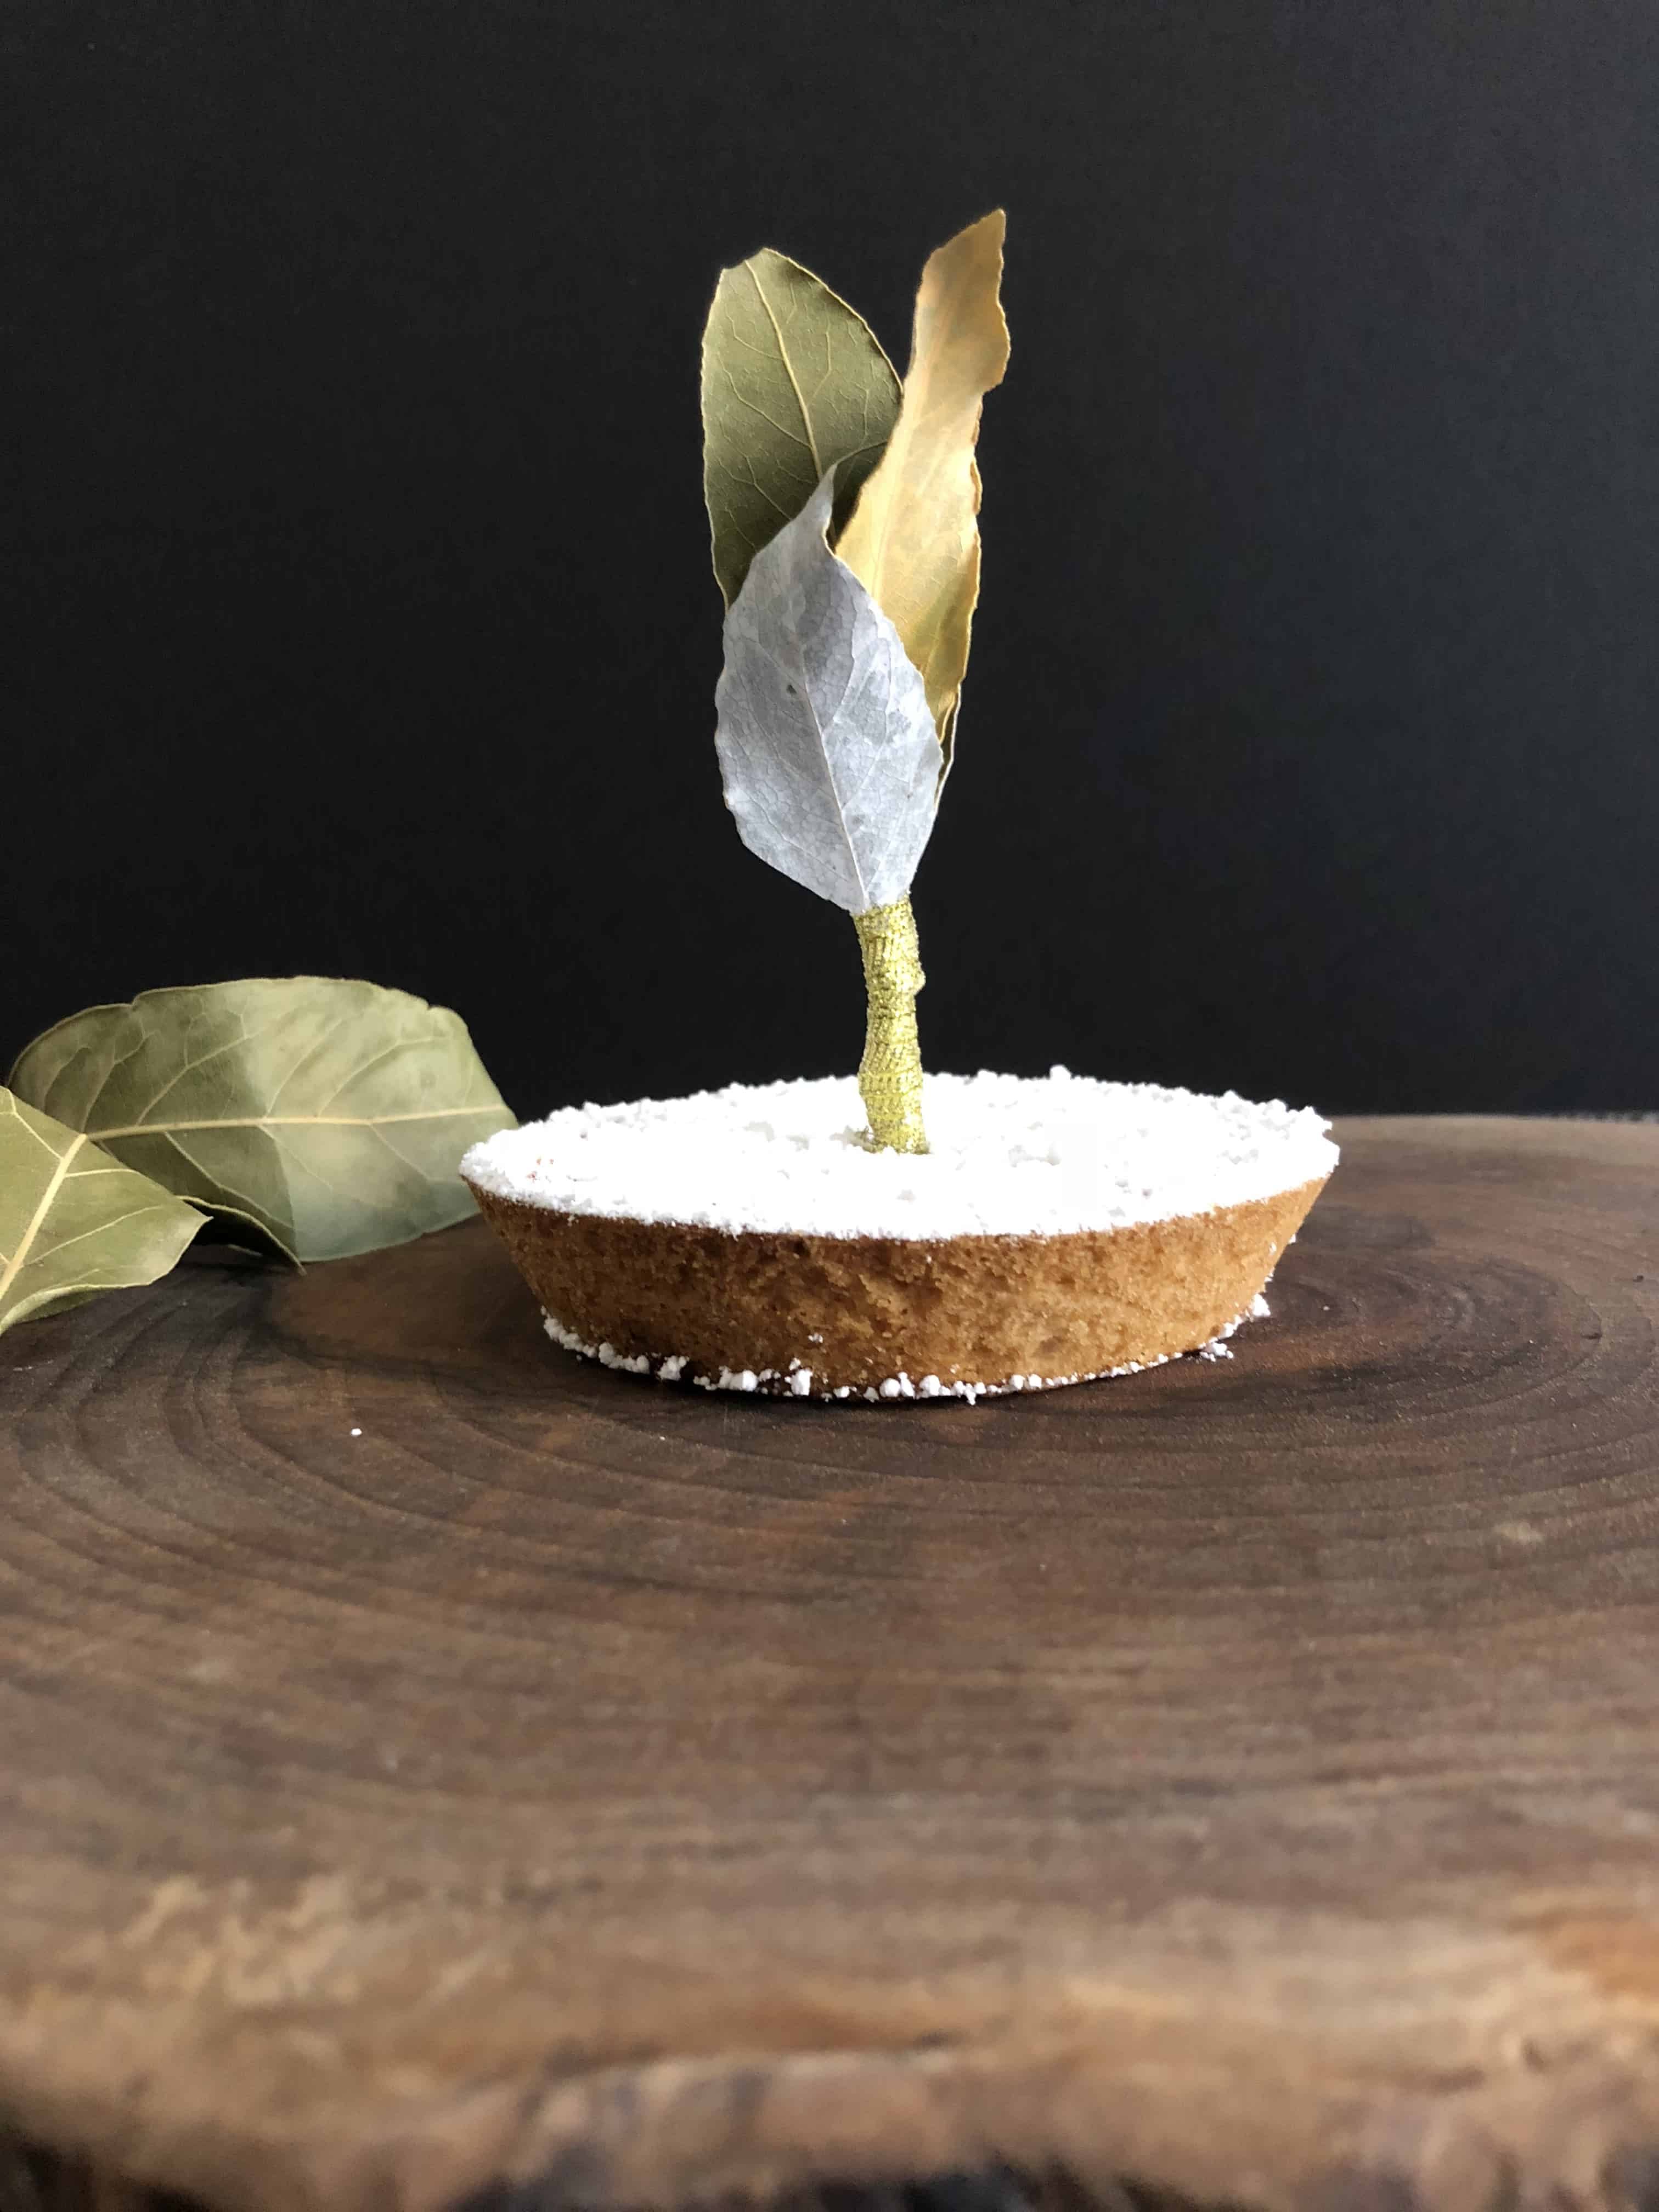
It´s mycurioseaty´s royal tart
In honour of the tart from the painted banquet, I have decided to laureate my royal tart as well, a bit more modest of course, with just a few leaves.
And now to the taste, which is a curious one I must admit. It seems like a mix between an almond cake and a baked cheese cake with spicy and floral touches, but definitely worth the try. Not many people can say they ate a royal tart just like the one served to Philips II of Spain.
So, fancy an ancient royal tart? Here´s your chance. Enjoy!
[1] Interpretation of the original
text. Dutch transcription by Hilde Sels and Marleen Willebrands, http://www.kookhistorie.nl/, version 20-05-09: Pelt een pont amandelen, die men eerst te weyck heeft geset, den tyt
van acht uren in cout water, ende als sy gepelt syn, stamptse met een pont
pinghelen, die ooc geweyckt hebben ses uren lanc in cout water, ende alsse wel
cleyn gestooten syn, doetter dan by twee pont fyn suycker geraspt, oft
gestooten, ende anderhalf pont roomkes, die vers is, oft in plaetse anderhalf pont
platten kese van schapenmelck, hierby ses doyeren van eyeren cleyn geclopt,
ende vier oncen appelen gestooten heel cleyn, ende een greyntjen muskes, ende
een half once gember, een lutsken rosewater, ende vraecht gyder niet naer,
oftse wit is oft niet: in plaetse van gember, doetter nagelen in, canneel, ende
noten muskaten, legtse in deech, laetse backen als voor.